Monday, December 5, 2022

Winners of my Growing in Unity week

 Hi, crafty friends! 

I’m excited to announce the winners from my GIU week-


Berina Febin 

And 

Kathy Dippner


Thank you all again for the likes and comments! Winners- please email kelli@unitystampco.com to claim your $20 gift credit within 2 weeks, in the subject line put "Winner from MariLynn’s GIU Week."

Friday, December 2, 2022

Day five Growing in Unity

 I am going to share a really fun project. I saw it on Facebook. It is Christmas ornaments made with plastic cups. I also used Unity Here today Here tomorrow butterfly stamp. 


To do this project you need cups that have a recycle 6 symbol. I got mine at Dollar general. You also need sharpie markers, a hole punch, embroidery thread, a foil covered cookie sheet and an oven. 


I took the cup and colored with multicolored sharpie markers and punched a hole in side. Learned the hard way that you have to punch first before you shrink the cup. Then turn oven on to broil setting. Place cup on foil covered cookie sheet. Then place in oven. These photos you will show you it melting 


After it melted I stamped the butterfly on the ornament using black stazon ink. 


Tried it again with different patterns. 


I put embroidery thread through the holes and wrote the date. 


Some tips:
Melt one cup at a time. Multiple cups didn’t melt evenly. 

Sometimes I had to push down on the cups to make them flatten completely. 

Melt them with the lip of the cup touching the cookie sheet. They stick together if you try them the other way. 

It is easy enough that kids can do this project. My 6 year old and 3 year old grandkids made some at Thanksgiving time. 


Thursday, December 1, 2022

Growing in Unity bow maker

Today I have a fun project to share with you. I made a fancy bow maker to give to a new stamping friend. I used the floral stamp from this past kit of the month called Everyday Fairytale

I took a piece of cardstock double the size of the stamped image. I stamped the flowers and folded the cardstock. 


I took four bamboos skewers and broke them so that they were the same length. I got glued them to the backside of the stamped floral


I then put hot glue all over the skewers and folded the lower half over the cardstock onto it sandwiching the skewers inside the cardstock. 

(Kind of like a matchbook)


I watercolored the floral image. 


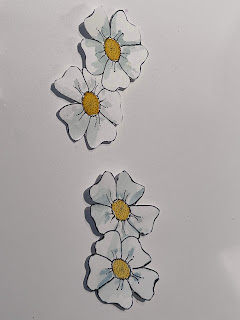
I stamped the flowers again, fussy cut and painted them. 


I used dimensional sticky tape to adhere these flowers on top of the already stamped flowers on the cardstock. 


This is the back of the bow maker. I wrote the 2 lengths of ribbon needed to make the bow. 
16 inches and 7 inches 


To make the bow you start with the 16 inch length bow. You weave it in and out of the bamboo skewers. Leaving about 3 inches over the left side. 

Then you weave back the other way 

Then back again 
You will have about 3 inches hanging off the right side 


Then you slip the 7 inch ribbon in the middle two skewers at the bottom and at the top 


Tie the 7 inch ribbon gathering the woven ribbon into a bow 

Then you slide the bow off. 


I hope you liked this fun project. Come back tomorrow for my last day of growing in Unity 


Wednesday, November 30, 2022

Growing in Unity day 3


I did a page in my art journal using stamps from the past kit of the month called Everyday Fairytale. I used two different techniques. I did masking technique to have the lightbulb look like it is over the books. With the masking technique you stamp the “front” image first then cover it up and stamp the “back” image. I then did a technique called highlighting where you only color part of the image to make it look like it is highlighted. I did this by using a ruler to draw parallel lines. I watercolored it. I added highlights with a white gel pen. I also added gilding flakes. I hand wrote holy Bible on one of the books. I also wrote the scripture. Hope this inspires you. Come back tomorrow for another fun project using Unity Stamps. 

Tuesday, November 29, 2022

Growing in Unity day 2


 For my project today I am sharing a bookmark. I have a group of kids that I teach for an after school program at my church. I was doing a lesson on not worrying. Matthew 6:26 was their memory verse that we were learning.   I went through all my stamps and pulled out birds and stamped them on bookmarks for the kids to color. Well of course I had to keep one for myself. This is the one I kept. I watercolored the birds. I hand wrote the scripture. I doodled the edges and painted the edges. I added embroidery floss at the top. The kids loved the bookmarks and all the “extras” were quickly claimed. Come back tomorrow for another fun project using Unity stamps. 

Sunday, November 27, 2022

Growing in Unity


I stamped the heart and masked it. I then stamped the music notes. I added a hand drawn banner that I hand lettered. To finish my artist trading card I doodled around the edges, watercolored the heart and watercolored the shading and I added some little rhinestones.  Thanks for visiting. Come back tomorrow to see another project using Unity. 

Friday, April 1, 2022

STAMPlorations April stencil challenge

 It is finally spring and time for STAMPlorations April Challenge 


My project this month is a page in my Bible based on a sermon I heard for mission Sunday emphasis at my Church. I used ARTplorations Stencil called Curved Play.  I traced the stencil onto the page using a pencil. Then I watercolored the path. I used a pen to journal the points. 


FYI - when you're looking at entries:
  • You can link up a maximum of 3 projects -- any type of project is welcome as long as a stencil is used -- but each project must be in its own blog post.
  • Use of stencil (any brand) is a requirement.
  • Non-STAMPlorations products are OK 
  • No sneak peek project entries; full project photo must be displayed on blog post in order to qualify for the prizes.
  • To qualify for the prize, you must display challenge graphic and have a text link to the challenge post (blogs only)

Prizes:

  • $20 prize code to winner ($25 if STAMPlorations/ARTplorations stencil was used)
  • $10 prize code to 2 randomly picked entries ($15 if STAMPlorations/ARTplorations stencil was used)

Tuesday, March 1, 2022

March STAMPlorations Stencil Challenge

 STAMPlorations Stencil Challenge:


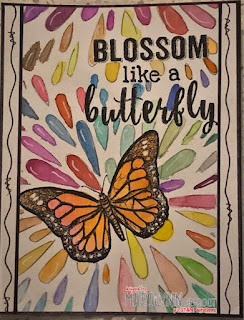
For many years I made cards that had multiple layers. I loved how they looked but hated that they were so hard to mail. So in recent days I have been trying to make cards that are one layer that look layered. Stencils are one way that help add interest and layers. I used Burst Stencil with Blossom Like a Butterfly stamp. 
I painted in each little section with watercolor paint. I added highlights with a white gel pen and a used a black sharpie marker to make the faux layer and added doodles with a black ink pen. 

I hope you join us for our stencil challenge. 
  • You can link up a maximum of 3 projects -- any type of project is welcome as long as a stencil is used -- but each project must be in its own blog post.
  • Use of stencil (any brand) is a requirement.
  • Non-STAMPlorations products are OK 
  • No sneak peek project entries; full project photo must be displayed on blog post in order to qualify for the prizes.
  • To qualify for the prize, you must display challenge graphic and have a text link to the challenge post (blogs only)


Prizes:

  • $20 prize code to winner ($25 if STAMPlorations/ARTplorations stencil was used)
  • $10 prize code to 2 randomly picked entries ($15 if STAMPlorations/ARTplorations stencil was used)


Saturday, January 1, 2022

STAMPlorations January Challenge.


Happy New Year. It is time for the January Stencil Challenge at STAMPlorations. 

For my project I used STAMPlorations
ARTplorations Peeking Sunflowers Stencil. 


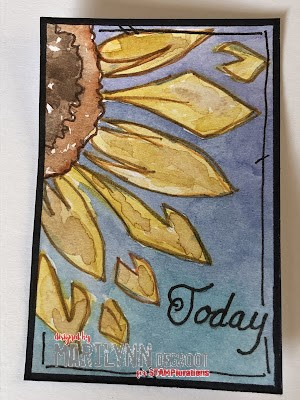
I made a little Artist Trading Card. 
I cut my cardstock to the ATC size of 3.5 inches by 2.5 inches.
I placed the stencil over the card and traced with a pencil lightly. 


I then watercolored the sunflower.


I took thin art pens and doodled over the pencil lines. I added my word for the year. "Today"
I am hoping to be intentional about living in the moment. Not worrying about tomorrow or being stuck in the past. 


My finished ATC has a sharpie marker edge and a thin doodled black line. 


On the back I wrote out one of the verses I intend to memorize about "today". This year.